


A beginner’s guide
When you’re a #CodeNewbie starting out on #100DaysOfCode, your Visual Studio Code setup probably leaves a lot to be desired. Here’s how to go from zero to professional web developer by installing and configuring some crucial extensions, themes, and add-ons.
What separates a professional web developer’s VS Code from a brand-new installation is the use of extensions, especially code formatters and linters that automatically detect and fix problems in your code.
Using code formatters (typically Prettier) and linters (usually ESLint) tend to be mandatory when contributing to open-source projects online. But they’re generally awesome to have even if you never plan to work on open-source.
Additionally, a nice theme makes VS Code easier to use, and it makes it feel like your own personal version. Along with a theme, you can add file icons that’ll let you see what type of files you’re working with at just a glance.
But you won’t really seem like a pro until you start using font ligatures that turn common code symbols (like => and !==) into human-readable versions. Plus, a nice programming font is just so easy on the eyes!
In this short tutorial, you’ll take a brand-new VS Code installation and turn it into a super-powered professional setup in about five minutes.
1. Install Extensions in VS Code
I’m going to recommend seven must-have extensions, with another seven optional ones. Of course, no extension is really mandatory — it’s your VS Code after all — but everyone should use a code formatter, linter, and theme.
The optional extensions are more for your quality of life. I’d suggest you install all 14 extensions at once since they’re free and quick. You can always disable or uninstall them afterward with just a few clicks inside of VS Code.
First, I’ll list the extensions in both categories, and then I’ll explain the purpose of each one — optional info for the curious folk.
How to install a VS Code extension
There are two ways to install extensions for VS Code, either using the online Visual Studio Marketplace or its equivalent inside VS Code.
From the web: Click on the link to the extension in the text below to open it up in the Visual Studio Marketplace; then click the “Install” button. Assuming you already have VS Code installed, click “Continue.” Your browser will then try to open a vscode link. Choose “Visual Studio Code” from the list, and then check “Remember my choice for vscode links” and click “Open link.”
From VSCode: Alternatively, look up the extension by name inside of VS Code on your computer by clicking the extensions icon on the left-hand activity bar — it looks like blocks getting stacked on top of each other. Search for each extension by name, clicking “Install” for each one.
The recommended extensions below appear in alphabetical
Description of each recommended VS Code extension
If you just want to get set up, and you don’t particularly care about what you just installed, then scroll on past this section as fast as you can! 


 Mandatory extensions
- ESLint
ESLint is a code linter for JavaScript and TypeScript that’ll catch many bugs as you write code, instead of when you run code. It’s necessary to contribute to many open-source projects and real-life workplaces. - HTMLHint
HTMLHint is a code linter for HTML that catches a lot of errors, especially the kinds that brand-new web developers tend to make. - Prettier — code formatter
Prettier automatically formats your code, including indentation, every time you save. By using the same Prettier configuration file with your teammates, you’re sure to have the exact same formatting. That means your Git repositories won’t have meaningless formatting changes. - stylelint
stylelint is a popular linter for CSS. Linting, also called static-code analysis, is a type of automated software testing as you write code. If you’re using “module CSS”, actual stylesheets (`.css` files), or some type of “CSS in JavaScript” (CSS-in-JS) solution like emotion or styled-components, I recommend stylelint. If you’re exclusively writing Tailwind CSS like I recommend, there’s no need for stylelint, but you should install the next plugin below (Tailwind CSS Intellisense). Also, add the `prettier-plugin-tailwindcss` package to your projects in order to sort your Tailwind classes automatically with Prettier. - Tailwind CSS Intellisense
You already use Tailwind CSS, so why not add the ability to hover over any given Tailwind class and see exactly what it means in terms of generated CSS? This super-useful extension also provides autocomplete, meaning `bg-red` will suggest `bg-red-50`, `bg-red-100`, etc, in addition to linting (squiggly red error lines). Yes! - vscode-icons
vscode-icons is a package of file icons that show up inside of VS Code and make it much easier to differentiate the file types you’re working with.
VSCode themes
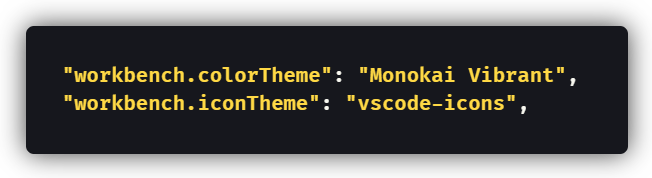
- Monokai Vibrant
Monokai Vibrant reminds me of 8-bit graphics and brightly colored cartoons. It’s my preferred theme for VS Code. - One Monokai Theme
One Monokai Theme is easy on the eyes. There are many offshoots of the Monokai theme, including a paid version called Monokai Pro. - Shades of Purple
Shades of Purple by Ahmad Awais is a great change of pace from other themes, as it showcases the color purple in a beautiful way.
Optional extensions
- Document This
Document This is a useful extension for creating JSDoc-style documentation quickly, if you’re into that kind of thing. - indent-rainbow
indent-rainbow makes following code indentation a million times clearer by giving each indent column its own rainbow color. - Live Server
Live Server is a popular extension that lets you launch a development server from inside VS Code; it’s useful for prototyping HTML and CSS. - Rainbow Brackets
Rainbow Brackets colorizes all of your bracket({[]})pairs to help you match opening and closing braces. I find it super useful! - Rainbow Highlighter
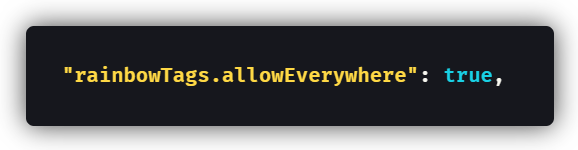
Rainbow Highlighter lets you highlight multiple variable names at the same time with rainbow boxes, a useful feature for searching. - Rainbow Tags
Rainbow Tags is like Rainbow Brackets, except it’s used for HTML tags. It even works on React.jsxfiles if you turn on an optional setting. - vscode-pigments
vscode-pigments makes reading color codes in HTML and CSS files just a little bit easier by highlighting color codes in their actual color.
2. Edit ´settings.json´ in VS Code:
Once you’ve installed all of the extensions, you need to configure them for use. That can be a real pain, especially with setting up Prettier.
Thankfully, you can import someone else’s VS Code settings through something called the settings.json file. Here’s how to do it:
- Open up the VS Code command palette (using the keyboard shortcut
Ctrl+Shift+Pon Windows orCmd+Shift+Pon Mac). - Type “settings JSON” into the command palette.
- Click the top item, “Preferences: Open Settings (JSON).”
- Replace your
settings.jsonfile with my file below.
My recommended ´settings.json´ file
To copy-paste my settings.json file, click “view raw code” to open the file in your browser as a GitHub gist; you’ll be able to copy the text from there.

I’d also recommend turning on settings sync in VS Code to back up your settings.json file now, though that’s entirely optional and up to you.
How to activate a VS Code theme
In my settings.json file above, I’m using the Monokai Vibrant theme. If you’d like to use something else, you could edit the settings.json file, but I’d recommend just switching to your theme manually. Here’s how to do that:
- Click the theme (or the gear icon next to it) in the extensions list.
- Click “Set Color Theme.”
- A drop-down menu will appear that says “Select Color Theme”; click on the name of your theme, as shown in this screenshot:

The new theme will be activated and saved in your settings.json file.
Explanation of VS Code ’settings.json’ configuration
Again, if you just want to start using VS Code, and you don’t care to learn obscure VS Code settings, then please scroll on past this section! 


Note: The following settings configure VS Code to automatically format your files whenever you save. That means you can just hit Ctrl+S (or Cmd+S on Mac) to format your code. Prettier will work on all your files, not just files in projects that have a configuration file (called .prettierrc) in them. You’ll be using the Prettier default preference of using 2 spaces to indent your lines. Finally, your files will autosave and format whenever you change focus.
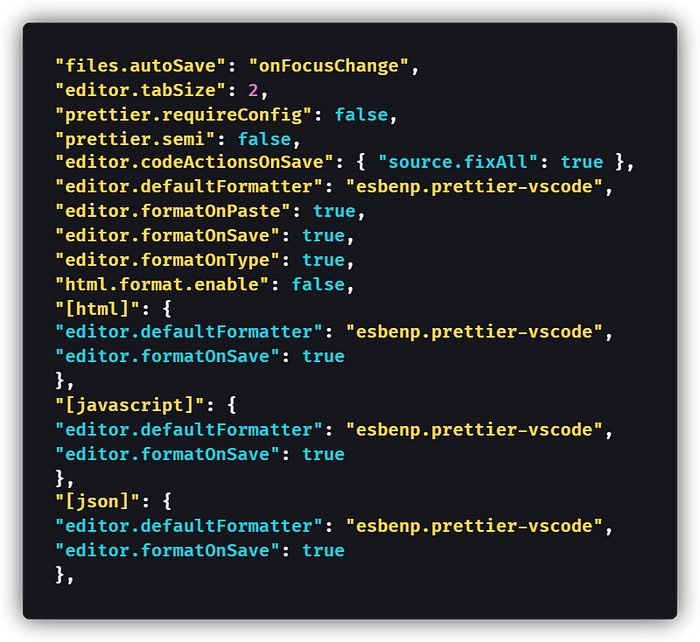
The below settings show ESLint’s current status and turn HTMLHint on.
The following settings set up your font. Later, I’ll explain installing the free font Fira Code, which features cool programming ligatures. But if you don’t install that font, you’ll just use the VS Code default of Consolas. If you want a font size larger or smaller than 20pt, you can change the setting here.

The setting below turns on word wrap for your word-wrap column setting (80 characters by default). I find it helps make code more readable.

The following settings turn on your theme and file icons.
The setting below enables the Rainbow Tags extension in all files, not just HTML files. That means it’ll work in React’s .jsx and other filetypes.
The following setting enables the use of the Tab key to expand the handy Emmet text snippets for HTML and CSS that are built into VS Code.
VS Code has awesome TypeScript-powered type checking built-in. You can use it with any JavaScript file by adding //@ts-check to the top line of the file. The following setting is the same as doing that for all of your files. With this setting enabled, you can disable it on a per-file basis with //@ts-ignore.

Please note javascript.implicitProjectConfig.checkJS was deprecated in favor of js/ts.implicitProjectConfig.checkJS:


Thanks to an alert reader for notifying me of this change to VS Code’s TypeScript settings. As noted in the screenshot, existing jsconfig.json or tsconfig.json files will override this setting.
 Wow, bored yet? Thankfully, you’re actually all set up with VS Code already if you used my exact
 settings.json file. I hope you like it! 
The last part of the article is optional.
I’ll talk about configuring Prettier, installing a cool font with font ligatures, and setting up a better terminal inside of VS Code (for Windows users).
Use Prettier to Remove Semicolons (Optional but Recommended):
I’m an advocate for turning off semicolons when programming in JavaScript. Coming from Ruby, which doesn’t use semicolons, I find them unnecessary. Thankfully, whether or not you care to use semicolons, Prettier will automatically add or remove them for you on every line — no sweat.
In the above settings.json file, I set a global Prettier setting: "prettier.semi": false. That’s equivalent to having a Prettier configuration file (called .prettierrc) with the setting of "semi": false.
When collaborating with others, you should use an explicit Prettier configuration file in order to make your code’s formatting match exactly with theirs. For example, if you opened up someone else’s file and removed all of their semicolons, they’d probably be mad at you.
But if they have a .prettierrc file containing the entry "semi": true, then your system would automatically use their preference of having semicolons. This is getting a bit advanced, which is why it’s optional for this beginner’s guide — but it’s good to know how Prettier settings work for collaboration.
I’d also point out that the online development tool CodeSandbox comes with Prettier installed on every project. Every web developer should know how Prettier works, even if you choose not to use it.
Add Fira Code Font and Font Ligatures (Optional but Recommended):
Fira Code is an awesome free font that comes with something called font ligatures. Font ligatures are little icons that replace other characters.
For programming, that means your code is going to become a lot more readable. Here’s an example: Fira Code will replace != with ≠. While your computer will display the ligature, the text actually still contains !=.
The settings.json file already assumes you’ve installed Fira Code (specifically the Semi Bold variant) and want font ligatures to be enabled. You’re free to skip this section if you don’t want those things.
1. Download Fira Code from the Fira Code GitHub repository by looking for the releases.
2. Extract the fonts (.ttf files) somewhere, such as your desktop.
3. Installation instructions differ for Mac OS versus Windows.
On Mac OS, browse to the downloaded ttf folder (such as \Downloads\Fira_Code_v5.2\ttf). Select all of the font files; then right-click and select “Open” (or equivalently “Open With Font Book”). Select “Install Font.”
On Windows 10, browse to the downloaded ttf folder (such as \Downloads\Fira_Code_v5.2\ttf). You’ll need to unblock each font file before installing it because of a Windows security precaution. To do so, right-click each font file, click “Properties,” and then check “Unblock” next to “Security” at the bottom of the General tab. (See the screenshot below.) Click “OK,” and then you’ll be able to actually install the font. Repeat the process of unblocking for each font file (six times total). Then, to install the fonts on Windows, you need to select all of the font files. Right-click on the selected files, and then choose Install.

Don’t forget you can change the font settings in VS Code. You can edit the settings.json file, or you can open up the VS Code settings normally and type “font” in the search bar. Similarly, you can search for “word wrap.”
Windows Only: Install Cmder as Your VS Code Terminal (Optional)
Mac and Linux users are going to have a great code-terminal experience out of the box, but Windows users should take a few more steps here. I recommend you download and install Cmder, a fantastic code terminal.
When you go to download Cmder, I suggest grabbing the Git for Windows version, which will automatically install all those fun Git tools into your terminal with no further configuration required.
Once installed, the Cmder wiki has detailed instructions for setting up Cmder as your terminal inside of VS Code. It takes a few minutes, but you’ll have a seamless, professional development environment with a built-in terminal.
Conclusion: Setting Up VS Code for Beginners
I genuinely wish I had this guide when I first started to use VS Code. Instead, I’ve had to compile these settings over the last year from real-world work, courses, and just using VS Code as my text editor on a daily basis.
Thankfully, because I recently needed to configure a new computer, you now have this beginner’s guide to setting up VS Code like a professional. I hope you find these extensions and settings to be useful.
The last thing I would mention to a brand-new software engineer is that, honestly speaking, a graphical program (also called a GUI) can make Git much easier to use than doing everything from the command line.
Personally, I use GitHub Desktop, which is available for both Windows and Mac (but not for Linux). If you’d rather use a host other than GitHub for your Git repository, then check out the official list of Git GUI programs.
Happy coding!